This journal documents my experiences using the Fuji X-E1 and 35mm lens.
Package Arrived
gear
Fri 02 Nov 2012 09:59:26 PM EDT
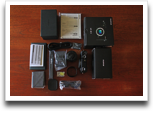
The box was waiting for me when I got home. Slight damage to the outer box; there doesn't seem to be any damage to the internals when I peeked through the hole.
Complete unboxing ceremony tomorrow, with photos (which may or may not be posted tomorrow).
The SD card in still in transit and is expected to arrive either tomorrow or Monday, which means that there will be no photos taken with the X-E1 before then.
Update Sat 03 Nov 2012 01:14:31 AM EDT: I just finished downloading the 35mm lens firmware update when I realized that I DON'T HAVE AN SD CARD READER at home; however, my Dell monitor at work has a multi-function card-reader built-in to the side.
The firmware versions of both the camera and lens can be checked by powering on the camera while the DISP/Back button is pressed. It would be a pleasant surprise if the lens had already been upgraded to 2.01 by Vistek.
Unboxing Teaser Photos
photos
Sat 03 Nov 2012 01:39:29 PM EDT
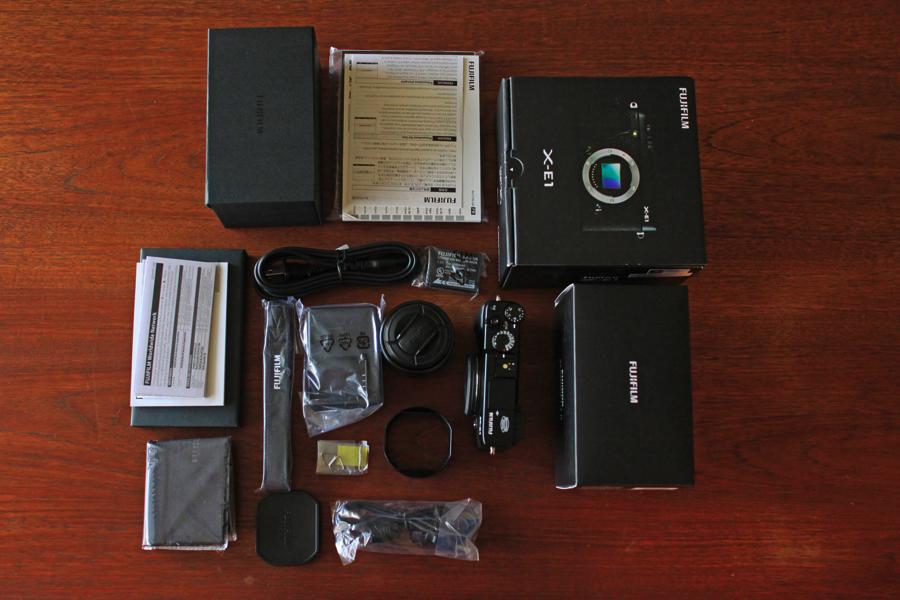
A couple of photos (click for larger view) of the unboxing ceremony to whet your appetite. The unboxing was photographed with a Canon 50D camera and the 24mm/1.4L lens. The table is a 1960s Scandinavian teak desk salvaged from the dumpster.
 |
 |
This is the final unboxing shot showing all the contents of both boxes. |
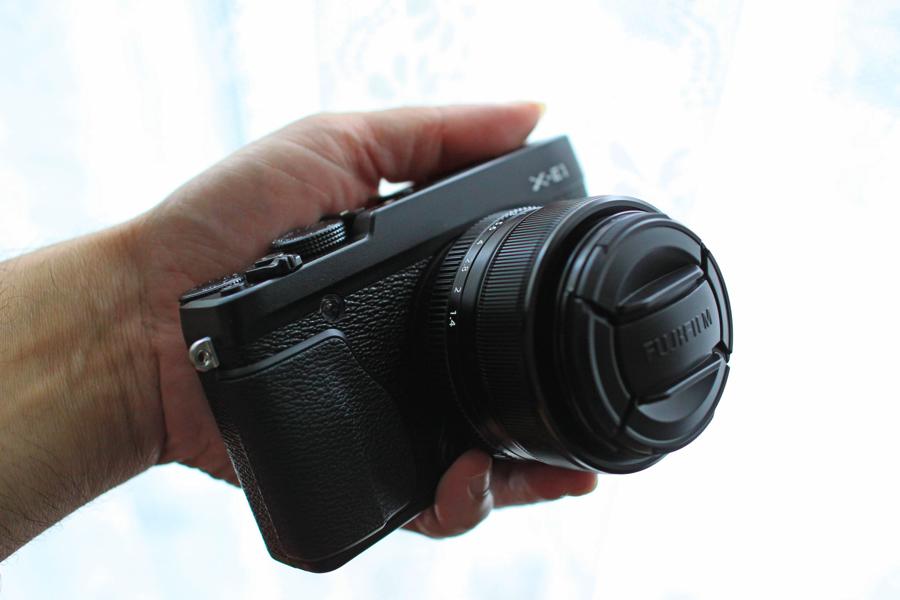
Side view of the camera. |
First Impressions
review
Sat 03 Nov 2012 01:45:33 PM EDT
When I first saw the camera, I thought, "Holy Fuji*, it's small! It's like a toy camera." Then I picked it up and wow, is it ever light.
Battery Charger
I flipped through the manual (French and Spanish versions also included) while the battery took about 2 hours to charge (expected time is 150 minutes). The charger has a power cord— welcome to 1995. I would have preferred the more compact flip-prong version which the XF-1 has (IIRC).
Battery
There are at least two ways to insert the battery and I put it in the wrong way first. I knew that was the wrong way because the orange latch wouldn't secure the battery. The battery compartment has to be latched manually after closing the door; the latch is not spring-loaded like the Canon 50D.
Date and Time
I turned it on, set the date and time (the AM/PM setting was confusing; note that there are separate entries for 1AM and 1PM which you have to scroll through). The camera suggested I upgrade the firmware (there was a slip of paper that said to expect this).
Silent Mode
I held-down the DISP/Back button for a few seconds to switch-off the beeping and whatever else sounds and lights the camera emits.
Focusing and Lens
I adjusted the diopter setting to accomodate my eye-sight and half-pressed the autofocus button— it focuses pretty fast. The focus motor is ... I can't find the right word... if the EF-24L motor— which is like a smooth caress and whispers when it focuses— is the equivalent of a Toyota Prius, then the XF-35 motor is like a rickshaw, there's a startling whirring sound and a "ka-chunk" when it locks focus. The front part of the lens moves in and out when it focuses.
When you switch off the camera, the lens "parks itself" and there's a click.
Update Sat 03 Nov 2012 06:35:10 PM EDT: A few moments ago, I performed an auto-focusing test shooting out the window, in late twilight and the camera performed admirably, taking just a hair longer to achieve focus than in daylight.
Buttons
The shutter button is not where my finger expects it to be (compared to my 50D); I have to raise my index finger to an un-natural position (this is to be expected, of course as the DSLR shutter button is on the front of the body). The thumb scroll-wheel (aka the Command Dial) feels rather sharp against my skin, like there's a burr on the bottom surface that hasn't been smoothed down in manufacturing. It doesn't feel nice.
Grip
Holding the camera feels OK, but not great. My hands are medium sized and I would prefer more surface contact against the base of my curved palm; right now, it's empty air. A more substantial grip towards the bottom of the camera might make room for a larger battery.
Since I don't have an SD card yet, the first photo will have to
wait.
X-E1 Unboxing Ceremony
photos
Sat 03 Nov 2012 11:08:27 PM EDT
The unboxing was photographed with a Canon 50D camera and the
24mm/1.4L lens.
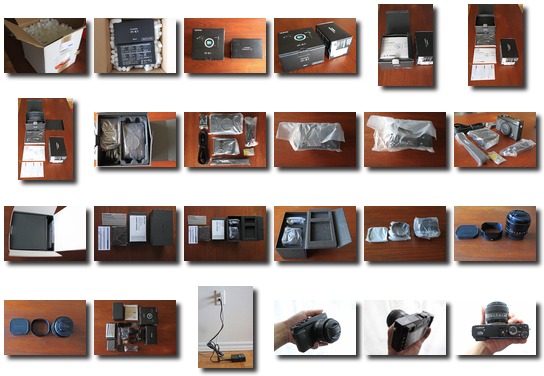 |
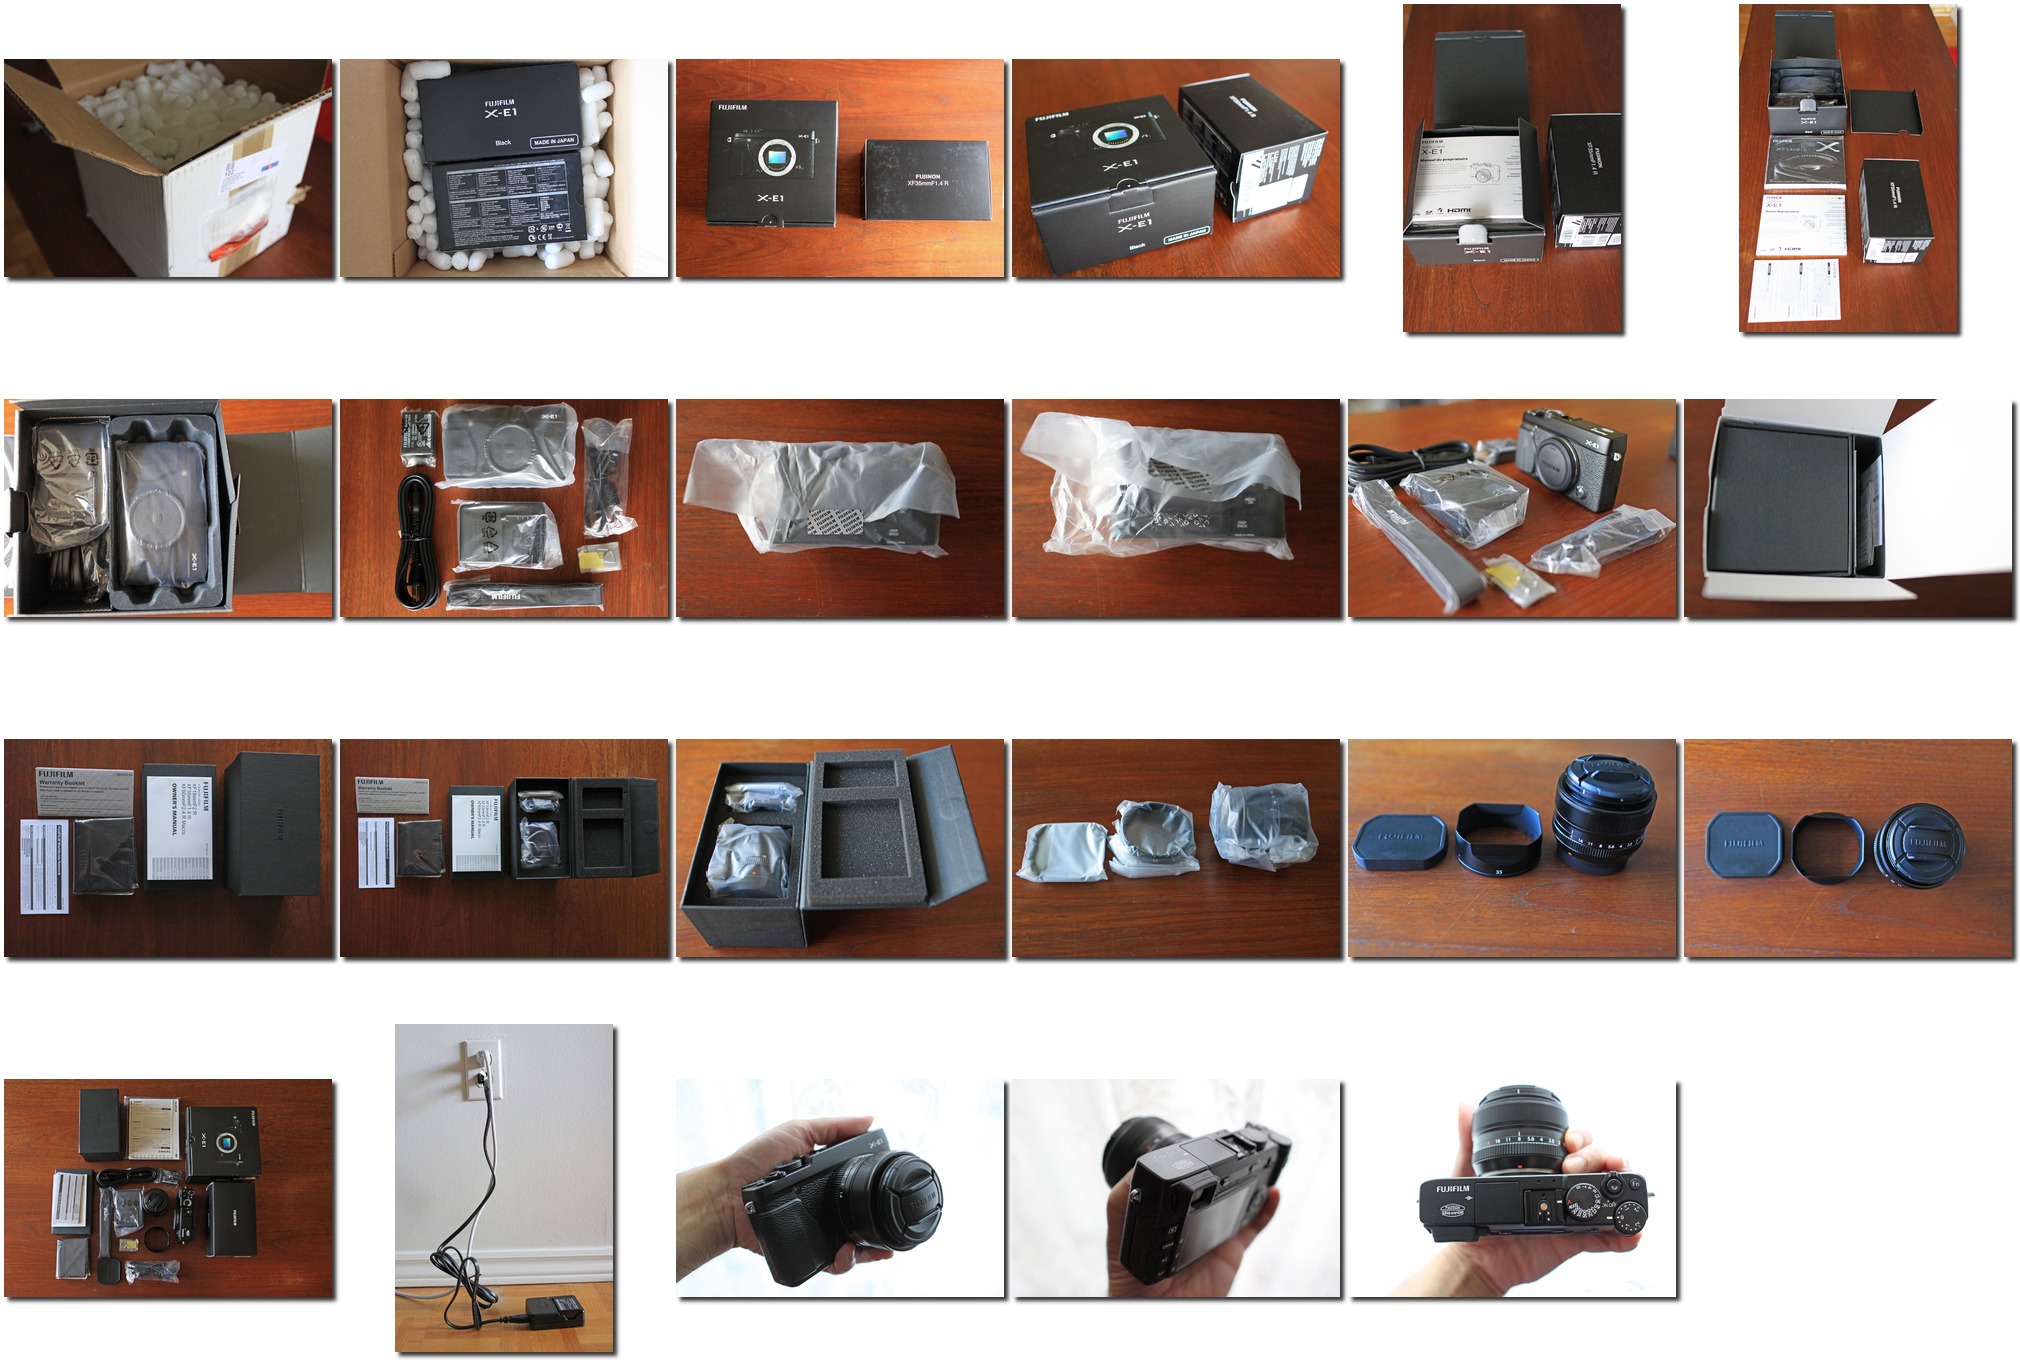
The X-E1 Unboxing Ceremony (thumbnail montage). |
Sun 04 Nov 2012 09:07:04 AM EST: The resolution of
the thumbnail montage was increased to 2020x1360.
Ocular Dominance
technique
Sun 04 Nov 2012 08:43:39 AM EST
One of the advantages of a camera with a viewfinder on the edge of the body (rather than in the center like a DSLR) is that the photographers face is partially visible to the subject (in street photography, a pleasant smile goes a long way in calming a stranger being photographed). It should be noted that the left side of your face is only visible if the camera is held up to the right eye.
Playing with the X-E1 last night, I noticed that I prefer to hold the viewfinder up to my left eye, thus hiding my face and getting my oily nose smooshed up against the LCD. This is remarkable because my right eye is the dominant eye.
I have to conciously hold the viewfinder up to my right eye and it feels strange to do so. I also noticed that the vision in my right eye is weaker than the left— which may explain my technique.
Sun 04 Nov 2012 11:23:27 AM EST: David responded:
The right hemisphere of the brain controls the left part of the body, the left-brain controls the right-body: laterality.
Furthermore, creativity is said (a bit unscientifically) to be centered or focused on the right side of the brain.
Given those two 'facts', there is a theory that one should compose photographs with one's left eye as it will use the right/creative side of the brain to frame the scene and create the image.
It's a bit pop psychology, but it was a nice ring to it.
Which reminded me of something I'd read about either Lucas or Spielberg saying about how they composed their shots. After some Googling, I discovered it was Fincher (I mis-remembered because of the reference to ILM):
Fincher mentions something he learned while working at ILM, that a director should look at a scene with the left eye for composition, because it goes to your right brain. Focus or technical side of a shot should be looked at with the right eye or left brain, as its more of a technical eye.
Fujifilm Not Fuji
names
Sun 04 Nov 2012 07:58:34 PM EST
I just realized that my camera is the "Fujifilm X-E1", and not the "Fuji X-E1". The logo on the top of the camera reads "FUJIFILM" as does the lens-cap.
Should I rename this journal or wait until Fuji realizes its destiny?
Using Command Dial to Change Quick Settings
review "dear fuji"
Mon 05 Nov 2012 12:00:03 AM EST
Dear Fuji, this is a suggested UI feature request.
Currently, the "Q" button brings up a menu layed out as a button grid of the most common settings that can be quickly customized (instead of going through the menus). The arrow keys are used to navigate between each setting in the grid while the command dial cycles through the value of the currenly selected setting.
I would like to propose the following UI:
- Press the Q button (the settings gird appears)
- Rotate the Command Dial to navigate sequentially through the settings (across the columns first, then down to next row, etc.)
- Press the Command Dial to select the setting to be modified
- Rotate the Command Dial to cycle through the values of the currently selected setting
- Press the Command Dial to confirm the currently displayed value
- Press DISP/BACK to abort
To summarize my proposal, there are two modes in the Q menu: 1) Navigate and 2) Modify. Turning the Command Dial in the Navigate mode let's you scroll through all the settings; pressing the Command Dial in the Navigate mode selects the setting you wish to change and switches to Modify mode. Turning the Command Dial in the Modify mode let's you you scroll through all the values for the current setting.Finally pressing the Command Dial in Modify mode sets the value and returns to Navigate mode.
On the Canon 50D, this is how the rear wheel, with the OK button in the centre, is used exclusively to navigate and then change menu settings.
Highres Photos of the Unboxing Ceremony
photos
Mon 05 Nov 2012 04:41:31 PM EST
Camera porn for the photo nerds showing high resolution photos of the unboxing ceremony with captions, in case you were wondering what some of the photos were about.
Todo List
todo
Mon 05 Nov 2012 11:13:10 PM EST
SD card arrived. Took some test pics indoors.
- Attach shoulder strap: in case the camera falls out of my hands
- Take more test photos: outdoors
- Post test photos: copy test photos from SD card
- Erase SD card: for use to upgrade firmware
- Download firmware: for
both body and lens.
- Upgrade firmware: v1.01 body firmware is currently installed
and it's so barebones I can't even zoom in to a photo in playback mode. Update Tue 06 Nov 2012 09:18:57 AM EST: I had set the camera's drive mode to "Continuous" which takes pictures as long as the shutter release is pressed. In playback, to zoom in to a individual photo in a continuous sequence you first have to press down-arrow to enter zoom-into-individual-photo-in-a sequence mode and only then can you zoom in even if there is only a single photo in the sequence. Dear Fuji, if your intent was to frustrate me, you have succeeded.
- Film simulation: shoot the same scene using each Film Simulation mode to get a feel for each of them
- Lens sharpness: find the aperture at which the lens is sharpest
Hand Grip Accessory
gear
Mon 05 Nov 2012 11:36:55 PM EST
Reading to the end of the manual I found that there is an optional handgrip accessory that offers a more substantial holding surface and moves the tripod socket to the center of the body. But it looks like it covers up the battery and memory card compartment. Couldn't they make a cutout for it?
Anyway, the accessory grip is something to consider because the camera always feels like it's going to fall out of my hand since the lens on one side is so much heavier.
First Photo
"sample photo"
Tue 06 Nov 2012 01:42:07 PM EST
For all intents and purposes this is my first photo taken with the X-E1. Click on the thumbnail for the original OOC un-retouched JPEG (400K). Shot in Aperture Priority mode with the 35mm lens at f/1.4, 1/52s at ISO 800, Pattern metering, Velvia Film Simulation.
It is interesting to note the filename convention: in single-shot mode, the files are prefixed DSFC####.JPG. The odd S002003.JPG filename is because this photograph was taken in Continuous (Burst) mode. It is image 0003 in sequence 002.
I can't say I like this convention of differentiating between photos taken as a continuous burst and one-off shots.
I am willing to wager that this distinction is for the benefit of the Fuji photo-browsing software.
Union Station Construction (pano)
photo
Tue 06 Nov 2012 03:02:08 PM EST
Union Station train shed (Track 10/11) showing the bright light when the roof is removed on left and the darkness otherwise. This is a two photo pano made in PS Elements, and photographed with the X-E1 this morning.
The photographs from the X-E1 seem sharper than those from the 50D. I find I don't even need to run Unsharp Mask on the X-E1 photos.
Version 2.0 Firmware Is Missing
firmware
Tue 06 Nov 2012 03:21:42 PM EST
I have found the version 2.0 lens firmware but the body firmware seems to be missing from the Fujifilm Drivers and Software page.
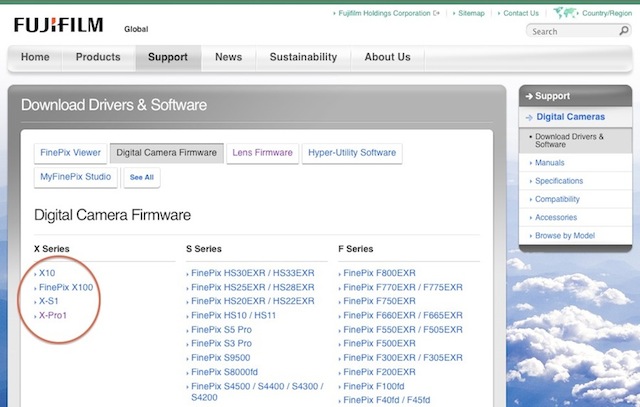 |
Fuji Body Firmware Download page. X-E1 is missing from the red circle. |
Update Tue 06 Nov 2012 03:34:17 PM EST: I emailed Fuji support the following email via their contact form:
Hi, I just bought a new Fuji X-E1 and it keeps telling me to update the firmware. I am looking for Fuji X-E1 body firmware update.
I went to the following page: http://www.fujifilm.com/support/digital_cameras/software/#firmware and X-E1 is missing.
Can you tell me where I could find the latest firmware update for the X-E1 body? Thank you.
Model: Fujifilm X-E1
Serial No: ****
Date of Purchase: Oct 24, 2012
Country: Canada
Oh. This is embarrassing. The message that flashes briefly on the camera says "Upgrade LENS Firmware".
What confused me were the the statements, "To enable those features, please update the firmware of your X-Pro1 into Ver 2.00 at first." on the 35mm lens firmware upgrade page, which made me think there was v.2 firmware for the X-E1 body.
Oops. Sorry Fuji.
First Day and Night Shooting Impressions
technique review "dear fuji"
Wed 07 Nov 2012 12:46:01 AM EST
Today was the first time I took the camera outdoors and did some shooting. I also re-read the camera manual (2nd time) on the train this morning.
I tried and failed to do a Passing Fancy shot, but that also had to do with unfamiliarity with the camera the high speed at which she was walking and the addition of wearing mitts because it was quite cold.
I made some changes to the default settings: I set Power-down to 30 seconds (to minimize the power consumption of the internal LCD) and I enabled Quickstart which puts the camera to sleep (still drawing minimal power) rather than shutting it down completely after 30 seconds because it was annoying to have to toggle the power switch to Off and then On every two minutes (my initial Power-down delay setting) after power-down.
On my way home tonight, I did some night shooting. I shot in Aperture Priority between f/1.4 and f/2.8 with max ISO of 1600. The camera is noticeably slower in focusing (it tends to hunt) than in daytime. I switched from auto-focus to manual focus and found that holding the AE/AF L button and releasing the shutter, I can achieve focus faster than letting the camera focus (thanks to Sergey for first mentioning this technique). Note: there is a caveat with the last statement because I have not actually looked at any of the photos taken using this technique, on a large screen; I have only pixel-peeped on the camera LCD.
In playback, to check focus, you can press the Command Dial and the LCD will zoom into the are where the camera focused; press the CmdDial again to zoom out. Very nice Fuji.
One thing I found cumbersome was having to constantly use the View button to toggle between Eye Sensor and Rear LCD whenever I had to change a setting and then return to shooting. I prefer to use the rear LCD to change settings and use the EVF to do my shooting. I can't change settings looking into the EVF because the arrow buttons are under my cheek. Dear Fuji, I would like a setting that switches on the rear LCD when the Menu or Q button is pressed when the photographer wants to change a setting and then switches back to the EVF for photoraphy without having to keep pressing the View button.
The photos will be posted tomorrow (see below). Note that I have already posted panoramas composed of photographs taken with the X-E1. Please visit my "2012" Picasaweb Album.
First Day Series
"sample photos"
Wed 07 Nov 2012 03:30:02 PM EST
Photos from the first day of shooting with the X-E1. I find that I don't need to run unsharp mask on any of the photos because they are already as sharp as I like them. I have lightened the shadows and darkened the hilights on a few of them and cropped a few. The comments on the individual photos make note of the post-processing (if any).
It should be noted that I have changed the Film Simulation from Provia to Velvia. I also set the ISO to max-out at 1600. All other settings remain the at the default settings.
The last photo, with the street lamp and maple tree is my favourite of the series. It's straight out of the camera with no processing at all.
I will finish posting the rest of the Day 1 photos on Friday.
X-Pro 1 "Dear Fuji"
Thu 08 Nov 2012 01:16:36 PM EST
X Pro 1 user Pedro Kok wrote a "Dear Fuji" letter outlining his wishlist for improvements.
I would whole-heartedly agree with many items on his wishlist especially the woefully underused Command Dial button. I was surprised how many times I pressed the button or spun the dial and nothing happened when something logical should have happened.
His assessment of the Q-button menu and interaction agrees with my comments, above.
In addition to overloading the other buttons with secondary functions, I also think that the Fn button can be overloaded, first-press changes ISO, second press, switches to movie mode, third press, do something else.
Firmware Update for X-E1 Body Version 1.01
firmware
Fri 09 Nov 2012 03:35:18 PM EST
Fuji announced a firmware update for the X-E1 to support the XF18-55 lens and the M-mount adapter.
The prime lenses should be updated to 2.01 prior to using them with the 1.01 firmware.
Lens Firmware Update Successfully
firmware
Sat 10 Nov 2012 10:28:23 AM EST
When Fuji says you need a fully charged battery before upgrading the firmware, they mean it! Yesterday, with a borrowed SD card, I tried updating the firmware with 2/3 bars on the battery (I had charged the battery two nights ago) and the camera refused to proceed because it detected that the battery wasn't fully charged.
So, I had to wait until I got home. I charged the battery overnight and then successfully updated the lens firmware this morning. To enter firmware update mode, hold down the DISP/Back button and switch on the camera and keep holding the button until the Firmware Update screen appears. Then, just follow the on-screen instructions and remember to select the correct entry Body Update or Lens Update accordingly. That menu entry shouldn't be there because accidently making the wrong choice will be catastrophic; the firmware type should really be embedded into the file and the camera should do the right thing.
Note that even though the download page indicates that the size of the downloaded firwmare file should be 365K, and to ensure that the downloaded file is that exact size, the actualy file size is 394K. I downloaded the file on three different computers to ensure that the Mac wasn't corrupting the file somehow, because when I first downloaded the firmware, the filesize didn't match the stated size.
Now, I won't be harrassed by the "Upgrade Lens Firmware" message, not only every time I switched-on the camera (I was willing to accept this) but every time I woke the camera up from power-save. Really, Fuji? Is it that important that you have to annoy me? How about just displaying the message when I first switch-on the camera?
Digital Level
review
Sat 10 Nov 2012 03:11:00 PM EST
A digital level can be displayed on the rear LCD when shooting. A perfectly levelled camera is indicated by a horizontal green line and when either end drops, the horizon changes to white and a blue line indicates the offset from the horizontal.
To my eyes at least, there is very little contrast between the light blue and white lines and it's difficult to notice when the camera is slightly unlevel. I would prefer an alternative: when the right hand side drops, display an up-arrow above the right hand side of the horizon (indicating, "raise the right side") and when the right side goes up, display a down-arrow below the horizon on the right hand side.
Things I Miss on the X-E1
review
Sun 11 Nov 2012 12:29:10 PM EST
This is a list of features I miss on the X-E1, that I liked on the Canon 50D:
- Create a new folder: I would create a new folder every morning before I left the house, so that I had a folder of photos per day. On birthdays, etc. it helped group all the event photos into a single folder.
- "My Menu" (custom menu): On Canon cameras, this menu can be populated with up to 8 entries of your choosing. I put in frequently used menu items like Mirror Lockup in this menu rather than having to hunt for them when I neede them. I also put the Set Date and Time entry in this menu so that I could quickly check the time since I don't wear a watch. A suggestion I had for Canon was to automatically put any setting I changed into My Menu, so that I could quickly find it again. If I changed the setting back to default, it would disappear from the My Menu (not quite sure about this part of the suggestion).
- Display clock: If you're not going to give me a "My Menu", at least display the time on the main menu screen (at the bottom-right would be nice). Right now, I take a picture and play it back to see what time it is. If you're not even going to display a clock in the menu bar then at least change the name of the menu item that sets the date and time, to the actual date and time. (Update Sun 02 Dec 2012 04:58:23 PM EST: The date and time are displayed when the camera wakes up. I only noticed it today because the camera happened to go to sleep just as I was ready to shoot and I was looking through the eyepiece when it woke up. Usually, I would wake the camera up while it was still at my hip so it would be ready to shoot by the time I lifted it to my eye.
What I Don't Miss from the 50D
review
Sun 11 Nov 2012 04:24:43 PM EST
- The weight: I don't miss the weight of the 50D. I would get a sore shoulder carrying the 50D with the 24L or the 24-105. The X-E1 is so amazingly light.
- The 50mm/1.4: it my everyday lens because it was light but it focused badly (it needed a -20 (maximum on the camera) micro-focus adjustment and it was still soft).
- Unsharp Mask: I had to sharpen every single image taken with the 50D; the 35mm on the X-E1 is so amazingly sharp, it's like looking at the world with a new pair of glasses.
- Mirror-Slap: The 50D was really loud and obtrusive.
Linds Redding
philosophy
Sun 11 Nov 2012 05:39:51 PM EST
I spent much of the weekend reading the eloquent blog of Linds Redding as he was diagnosed with cancer and his battle with it. You can read about it by clicking on the link anchored by the word "here" in the right column, under his photo.
This is only tangentially related to my journal because he documented his battle with a Fuji X100.
Sadly, he lost the battle last month.
Photo: Bookshelf (non-fiction)
photo
Mon 12 Nov 2012 06:53:58 PM EST
Indoors at f/2, 1/50s gives a very clean ISO 1600 photo. Shadows boosted slightly.
Manual Focus with AEL/AFL Button
"sample photos"
Tue 13 Nov 2012 06:21:17 PM EST
These are photos taken on the first night, that were focused with the X-E1 in Manual mode (rotator switch on the front of the camera) and using the AEL/AFL button on the back of the camera. For some reason the camera locks (there is no hunting) on and focuses faster using this method over the AF method. I don't know why. Update Tue 13 Nov 2012 11:04:42 PM EST: I took a photo tonight where the camera hunted in manual mode.
Exposure Compensation Setting Visibility
review
Thu 15 Nov 2012 09:48:04 PM EST
I took some pictures on Wednesday morning, a bright sunny day. When I looked at them on the computer, I noticed that they were really dark. That's odd, I thought and forgot about it. Today, when I was reviewing them on the camera LCD with all the photo details enabled, I noticed that the Exposure Compensation was set to -2EV! I must have accidently jostled the dial while I was fishing for a tissue or putting on my gloves and had the camera hanging down my shoulder and rubbing against my jacket. Thinking back on it, I did feel that the EVF was a bit dark when I was shooting those particular photos.
Because I was used to seeing the exposure meter on the bottom, middle of the Canon 50D's viewfinder, I don't notice the exposure meter on the left side of the X-E1 screen. The bmeter is rendered in white and tends to go unnoticed. Perhaps if it was displayed against a dark, translucent background, it might help visibility. (Update: Mon 19 Nov 2012 09:25:26 AM EST: The exposure meter is actually rendered against a dark, translucent background; I never noticed. This means that it's the white colour of the text which is not prominent enough) If the numbers below 0 were rendered in a different colour than the numbers above 0, it might also help visually indicate under-exposure and over-exposure with a colour.
There is an exposure histogram but I tend not to pay attention to it when I'm composing. In fact, the camera is usually right that I even avoid looking at the shutter speed to see if it's fast enough (though the camera shake warning does appear prominently enough for me to take notice).
Wake from Power Save vs. Power On
review "dear fuji"
Mon 19 Nov 2012 09:27:02 AM EST
The camera does not behave differently when waking from Power Save than when it is powered on for the first time.
This is rather an important distinction because I prefer the sensor to be cleaned when the camera powers on (you can customize when the sensor is cleaned: at power on or at shutdown). By default, the sensor is cleaned at shutdown. I customized it to clean at power up, but then I found that the sensor is cleaned EVERY TIME I WAKE THE CAMERA UP from power save mode.
To conserve battery, I have the camera to go to sleep after 30s of inactivity. This means that when I spot my subject, I tap the shutter button while the camera is still on my hip, and by the time I have brought it up to my eye it is ready to shoot. But when the sensor cleaning is enabled, it's still cleaning the sensor when it reaches my eye. The extra delay of the sensor cleaning every time the camera wakes up rather than just at power-up, is annoying.
Dear Fuji, a Power On should not be the same as a Wake from Power Save. Think of it as a computer boots at Power On and then enables the screen-saver in Power Save. In it's current behaviour, the camera is doing the equivalent of a Check Disk every time it wakes up.
Drop Test
gear
Tue 20 Nov 2012 10:22:54 PM EST
I can confirm that a X-E1 dropped indoors on to linoeum covered concrete from hip-height (about 4 feet) can survive with cosmetic (deformed) damage to the lens hood.
This evening, after leaving my office, I hung my camera over my shoulder via the strap, lens-side towards my body. While I was putting on my gloves I felt the strap slip and the camera hit the ground. It was lying on the linoleum bottom-side up. I picked up the camera and looked at the front of the lens and noticed that the aperture was opening and closing (the dial had shifted to Continuous focus). I shut off the camera, and moved the dial to Single shot. I closed the side door that had popped open.
I powered up the camera and it seemed fine. I then noticed that the left side of the lens hood was deformed. I tried removing it; it rotated about 1/8th of a turn and stuck. I compared the left side of the hood with the right and noticed that the rear edge which connects to the lens body had also deformed and was probably squeezing the groove.
When the camera slipped from my shoulder, I didn't even feel it fall because it's so light. I have never dropped the 50D because it's so heavy and I have enough warning to grab the strap when it slips off my shoulder. When the camera fell, the lens hood absorbed all the shock of the drop. It looks like the deformed hood will remain permanently attached to this lens. Not a big deal. I was fortunate that I carry the camera lens side in and that the camera is lens heavy. If the camera trajectory had been such that it had landed body-first, I might not have been so fortunate.
I continued taking photos on the way to Union station and the camera behaved as expected without any malfunctions. I have not yet pixel-peeped at the photos to check if the lens is still focussing accurately.
I should note that both my Canon point-and-shoots, the S30 and the S60, had fallen from lesser distances resulting in functional damage (the S30 had to be serviced); I didn't bother with the S60 and bought the 50D instead.
Photos to appear.
Night and Day
photos
Wed 21 Nov 2012 02:39:38 PM EST
Friday Foto: CN Tower and Union Station
photo
Fri 23 Nov 2012 01:05:43 PM EST
Below is the three-step process showing the original photo, the perspective corrected version and the final cropped photograph (as seen above).
Endings
links
Fri 23 Nov 2012 03:48:13 PM EST
First, the end of film photography is documented by Robert Burley, a faculty member at Ryerson, in his book, The Disappearance of Darkness.
Next, the Kodak scientist who made colour digital photography possible, Bryce Bayer, passed away this week.
Finally, a light-hearted homage to Hostess Twinkies.
The Fn Button
technique
Sun 25 Nov 2012 10:38:07 PM EST
The Fn button is a user-programmable button located to the right of the shutter release. I have programmed it to toggle Movie Recording mode because it was taking too many button presses for me to switch from photo mode to movie mode. If I ever saw a plane falling out of the sky, the plane would have crashed and burned before I began recording the video. To program the Fn button, just hold it down for a few seconds and a menu will appear with a list of functions the button can be programmed to perform.
Normal sequence to switch to video recording mode:
- Wake camera from sleep
- Switch to rear LCD view
- Select the Drive menu
- Cursor Up to wrap-around from Single Shot to Video
- Press OK
- Press shutter button to begin recording
New sequence:
- Wake camera
- Press Fn
- Press shutter button to begin recording
After I programmed the button, I tried it out and I noticed that the camera wasn't auto-focusing as I panned the camera around. Then I realized that was because the camera was in Manual Focus mode— oh happy accident— you can record video with locked focus! In the past, whenever I recorded video, the camera sometimes lost AF for a considerable period of time resulting in portions of blurry video.
History of Architecture I
architecture
Mon 26 Nov 2012 09:28:48 AM EST
I am currently taking Arch 5110: The History of Architecture I at Ohio State University, taught by Prof. Jacqueline Gargus via iTunes University. The entire course is free and I watch one 45 minute video lecture every evening.
I have just finished Lecture 11: Byzantine Architecture; I am enjoying the lectures so far. I would recommend the course to armchair tourists, architourists and architecture photographers. The course is useful because of the cultural insights it gives; e.g. the design of buildings influencing city planning. It provides more context than reading the Wikipedia entry for each architectural style. It is not a complete history as Asian architecture is not covered. I could re-watch each episode and learn something new that I missed the first time.
Fall Scenes
photos
Thu 29 Nov 2012 10:28:18 AM EST